Secure and configure your SmartiePal AI assistant (step-by-step tutorial)
3 October 2025In this tutorial, you'll learn how to implement two essential configurations for your SmartiePal assistant: reCAPTCHA security protection and AI behavior settings. Following the design customization from the previous tutorial, we'll now focus on protecting your assistant from automated abuse and customizing how it responds to your users. These configurations are critical for maintaining cost control, preventing unauthorized use, and ensuring your assistant aligns with your brand standards.

Understanding reCAPTCHA Protection
reCAPTCHA is a security service by Google that protects your chatbot from automated abuse. For your SmartiePal assistant, implementing reCAPTCHA is critical for three main reasons:
Cost Protection
Every chatbot interaction consumes API tokens. Without reCAPTCHA, automated bots could send thousands of requests to your assistant, rapidly depleting your API quota and incurring unnecessary costs. This protection ensures your resources are used only by legitimate visitors.
Preventing Unauthorized Use
Without reCAPTCHA, anyone could extract your assistant's ID and embed it on their own website, effectively stealing your service and resources. reCAPTCHA verifies that requests originate from your authorized domain, preventing this type of abuse.
Maintaining Performance and Availability
Bot attacks can overwhelm your server resources, degrading performance or causing outages for legitimate users who require assistance. reCAPTCHA filters out malicious traffic before it impacts your system.
We'll be configuring reCAPTCHA v3, which operates invisibly in the background without interrupting the user experience. There's also an Enterprise option available for high-traffic applications with advanced security requirements, but v3 is suitable for most implementations and is available at no cost.
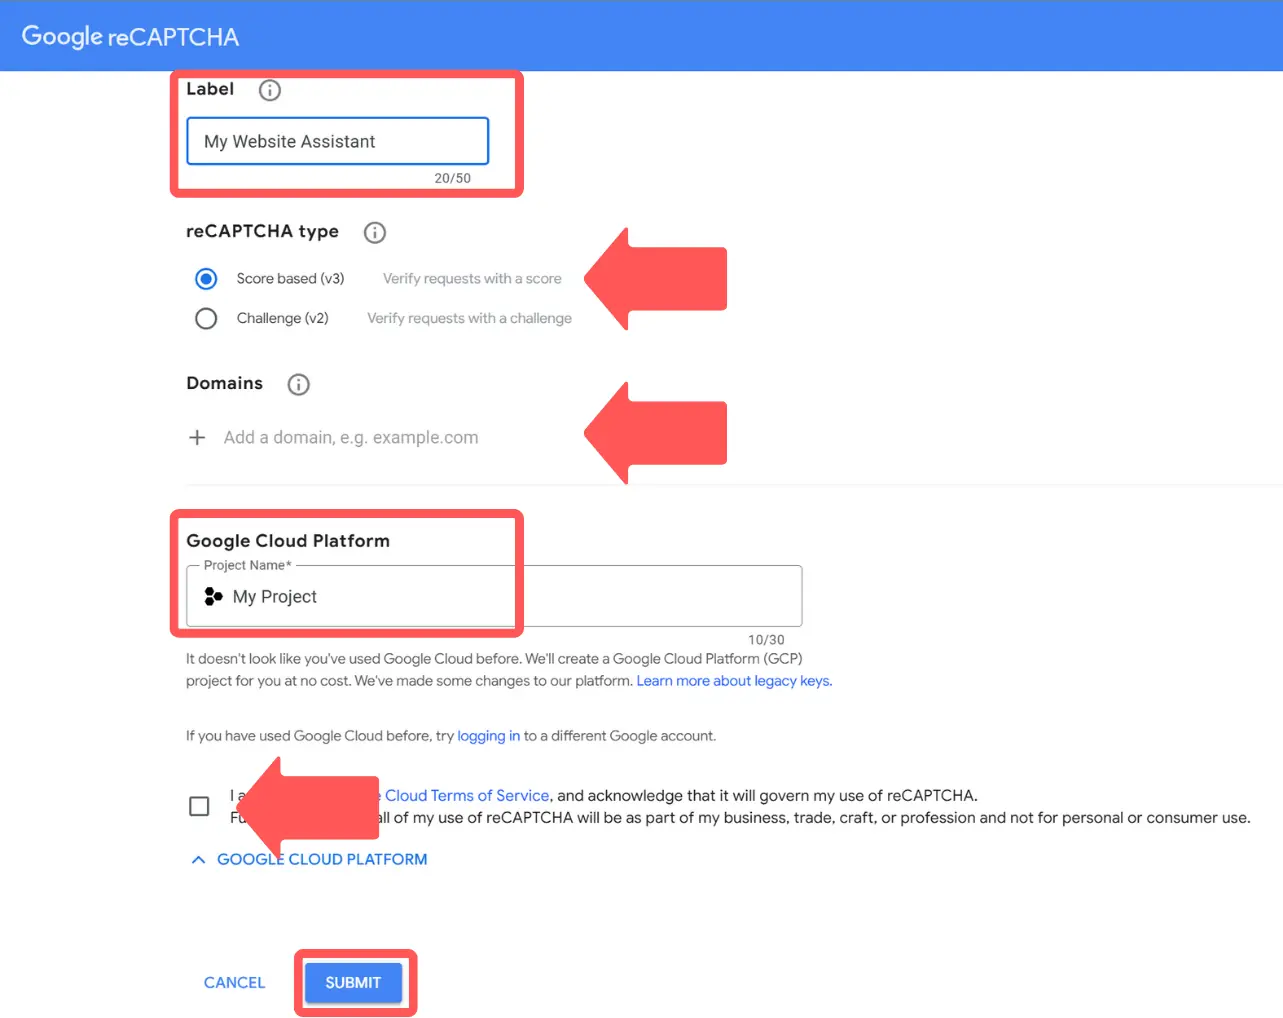
Step 1: Register Your Site with Google reCAPTCHA
- Access the Google reCAPTCHA admin console at google.com/recaptcha/admin.
- Click on the + button to register a new site.
- Enter a descriptive label for your site (e.g., "My Website Assistant").
- Select reCAPTCHA v3 as the reCAPTCHA type.
- Add your domain name (without http:// or https://).
- Accept the reCAPTCHA Terms of Service.
- Click Submit to complete the registration.
Upon completion, you'll receive two critical pieces of information: a site key and a secret key. Keep these available as we'll need them in the next step.
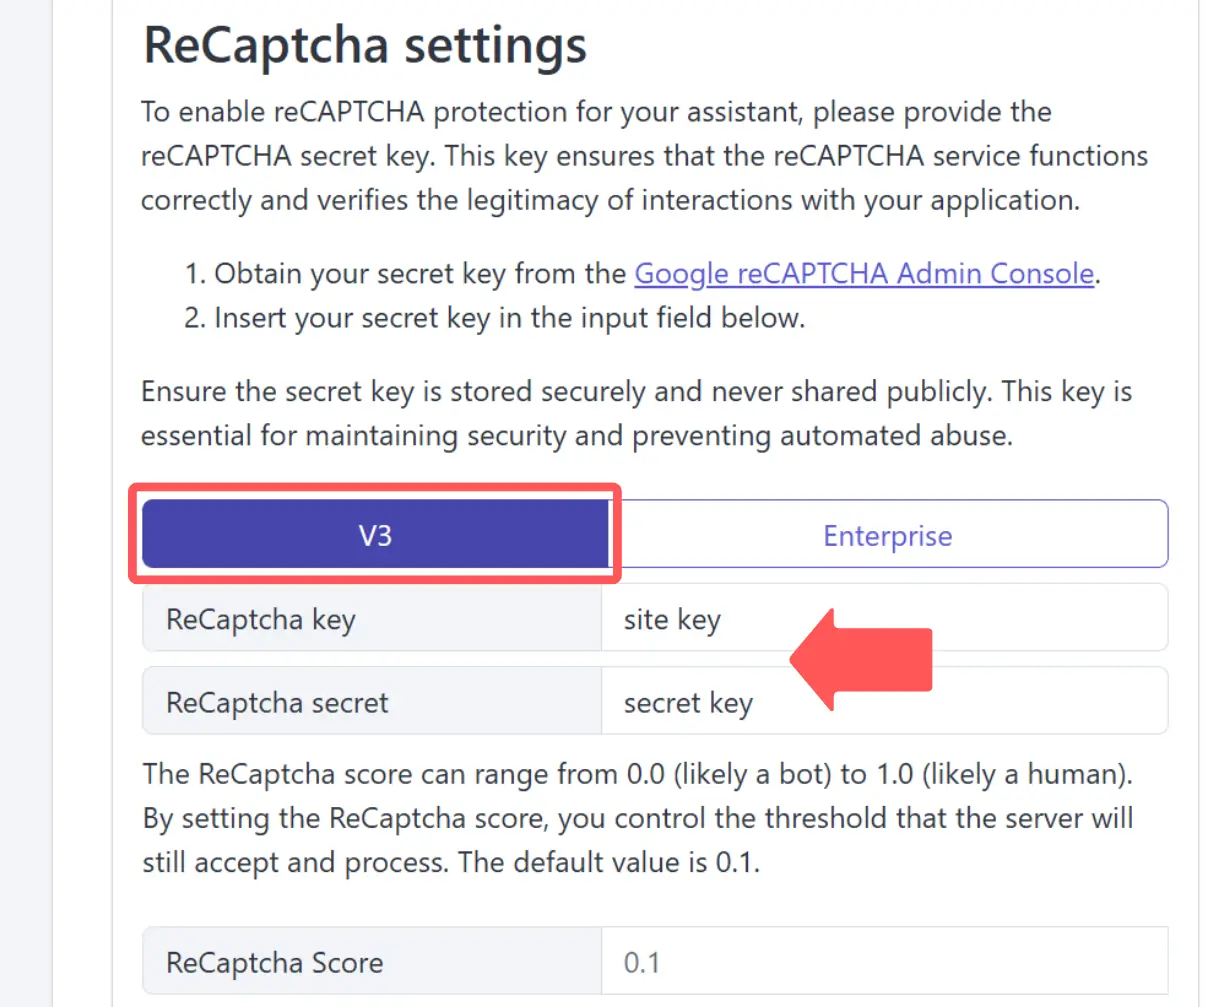
Step 2: Configure reCAPTCHA in Your SmartiePal Admin Console
- Log into your SmartiePal Administrator console and navigate to your assistant.
- Open the Settings section and locate the reCAPTCHA configuration area.
- Ensure v3 (or your chosen version) is selected at the top of the section.
- In the reCAPTCHA key field, paste your site key from Google. This key is used on your website's client side.
- In the reCAPTCHA secret field, paste your secret key. This is your private key used for server-side verification.
- Keep this key secure and never expose it publicly or commit it to public repositories.
Important: The secret key should remain confidential. It's used by SmartiePal's servers to verify reCAPTCHA responses and should never be shared or exposed in client-side code.
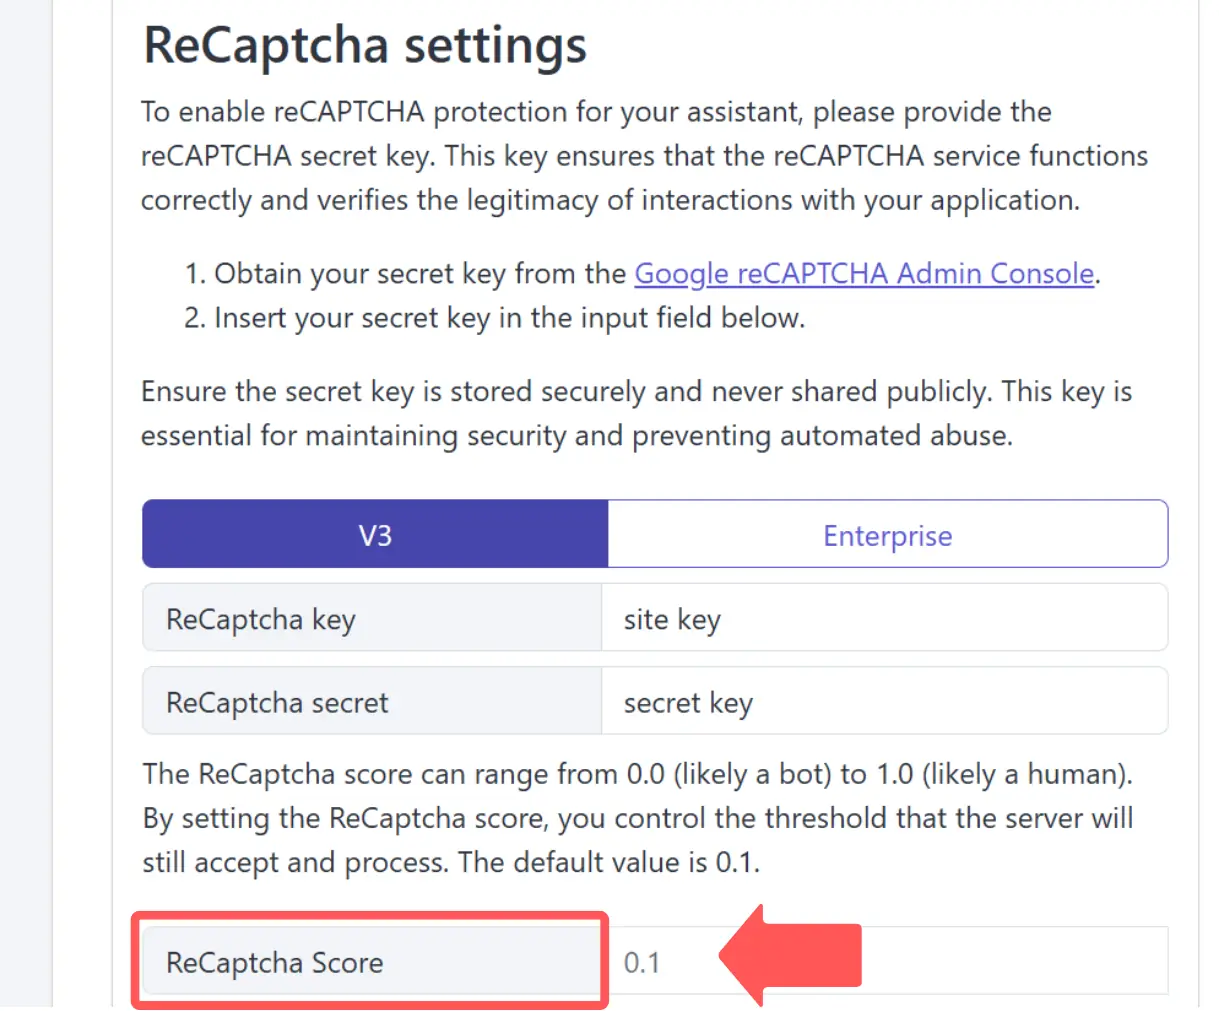
Step 3: Configure the reCAPTCHA Score Threshold
- Locate the reCAPTCHA score threshold setting in the configuration panel.
- Understand that reCAPTCHA v3 assigns each interaction a score from 0 (likely a bot) to 1 (likely a human).
- The default threshold is 0.1, which blocks obvious automated traffic while permitting legitimate users.
- If you experience bot-related issues, you can increase this value to 0.3 or 0.5 for stricter filtering.
- Be aware that higher thresholds may occasionally affect legitimate users on VPNs or shared networks.
Start with the default 0.1 threshold and monitor your traffic. You can adjust this value based on your specific security requirements and user feedback.
Step 4: Save and Activate reCAPTCHA Protection
- Review all your reCAPTCHA settings to ensure accuracy.
- Click Save to activate reCAPTCHA protection for your assistant.
- The protection will be active immediately for all new interactions with your assistant.
Your assistant is now protected against automated abuse. reCAPTCHA v3 will work silently in the background, analyzing each interaction without disrupting the user experience.
Configuring AI Behavior Settings
Now let's configure your AI assistant's behavior in the AI Settings section. This section controls your assistant's response parameters, content boundaries, and interaction style. Proper configuration ensures your assistant represents your brand appropriately and provides helpful, on-brand responses to your users.
Step 5: Understanding Preset Instructions
Each SmartiePal assistant includes built-in preset instructions that prevent responses to inappropriate topics such as:
- Political discussions or opinions
- Personal opinions on sensitive matters
- Jokes or humor that could be misinterpreted
- Other sensitive subjects that could present risks for your business
These preset instructions create a professional baseline for your assistant's behavior. You have full control over these parameters and can extend or replace them based on your specific requirements.
Step 6: Add Custom Instructions
- Locate the Instructions field in the AI Settings section.
- Add custom rules that extend the preset instructions to align with your business needs.
- Consider including instructions such as:
- "Always reference our 30-day return policy when discussing returns"
- "Direct pricing inquiries to the sales team at sales@example.com"
- "Maintain a professional and courteous tone in all interactions"
- "Use British English spelling in all responses"
- "Avoid making promises about delivery times without checking current stock levels"
- Write clear, specific instructions that define the behavior you want to see.
These custom instructions allow you to align the assistant's behavior with your brand standards, company policies, and business requirements. The more specific your instructions, the more consistent your assistant's responses will be.
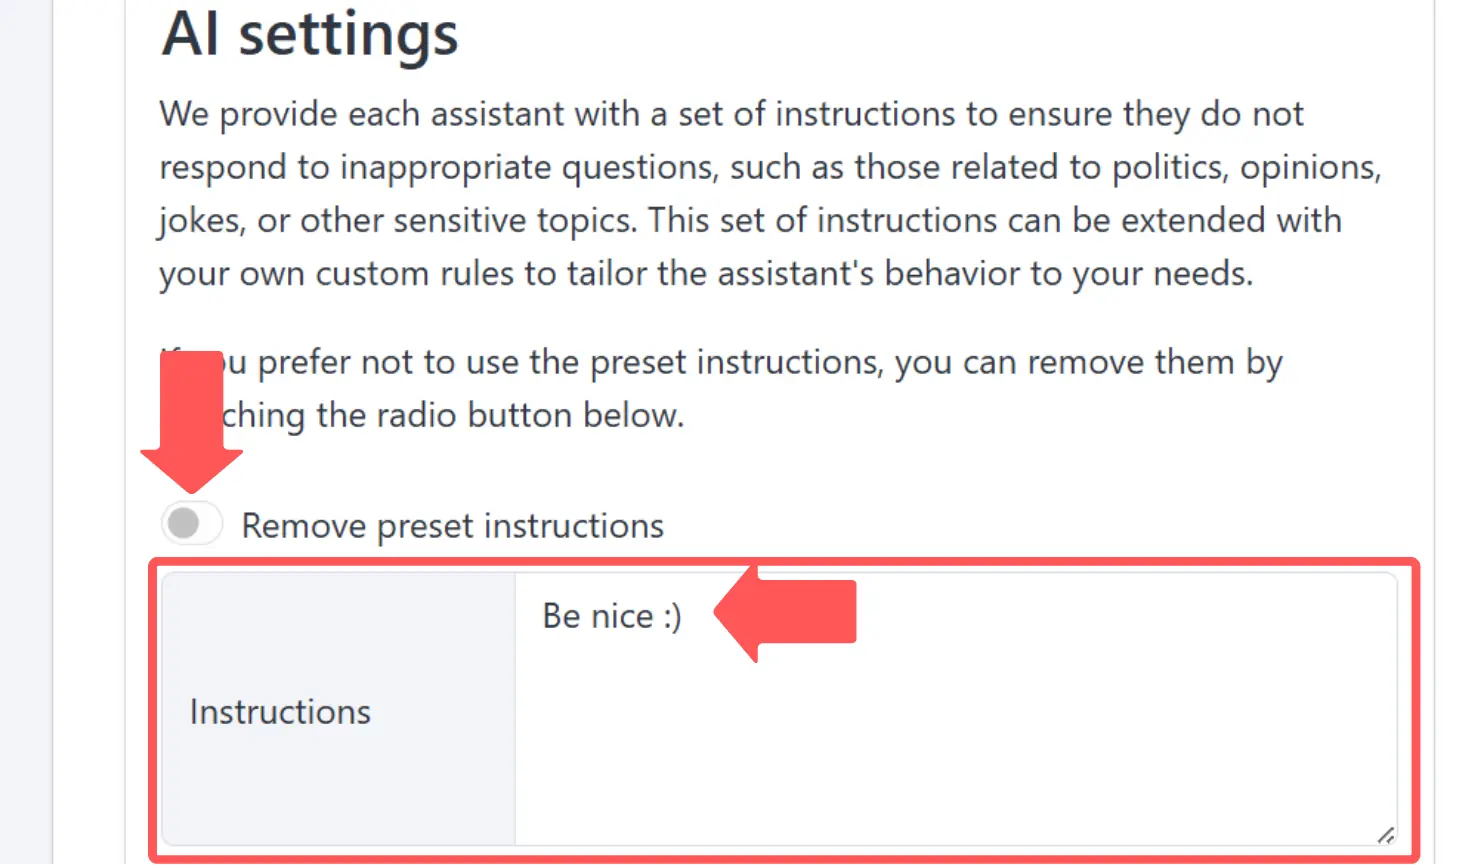
Step 7: Advanced Options - Remove Preset Instructions (Optional)
- If you prefer complete control over the instruction set, locate the Remove Preset Instructions checkbox.
- Enable this option to define all parameters from scratch without the built-in safety guidelines.
- When enabled, you'll need to provide comprehensive instructions covering all aspects of your assistant's behavior.
Note: For most implementations, extending the preset instructions with custom rules provides an effective balance between safety and customization. Only remove preset instructions if you have specific requirements that conflict with the defaults and you're comfortable defining complete behavior guidelines.
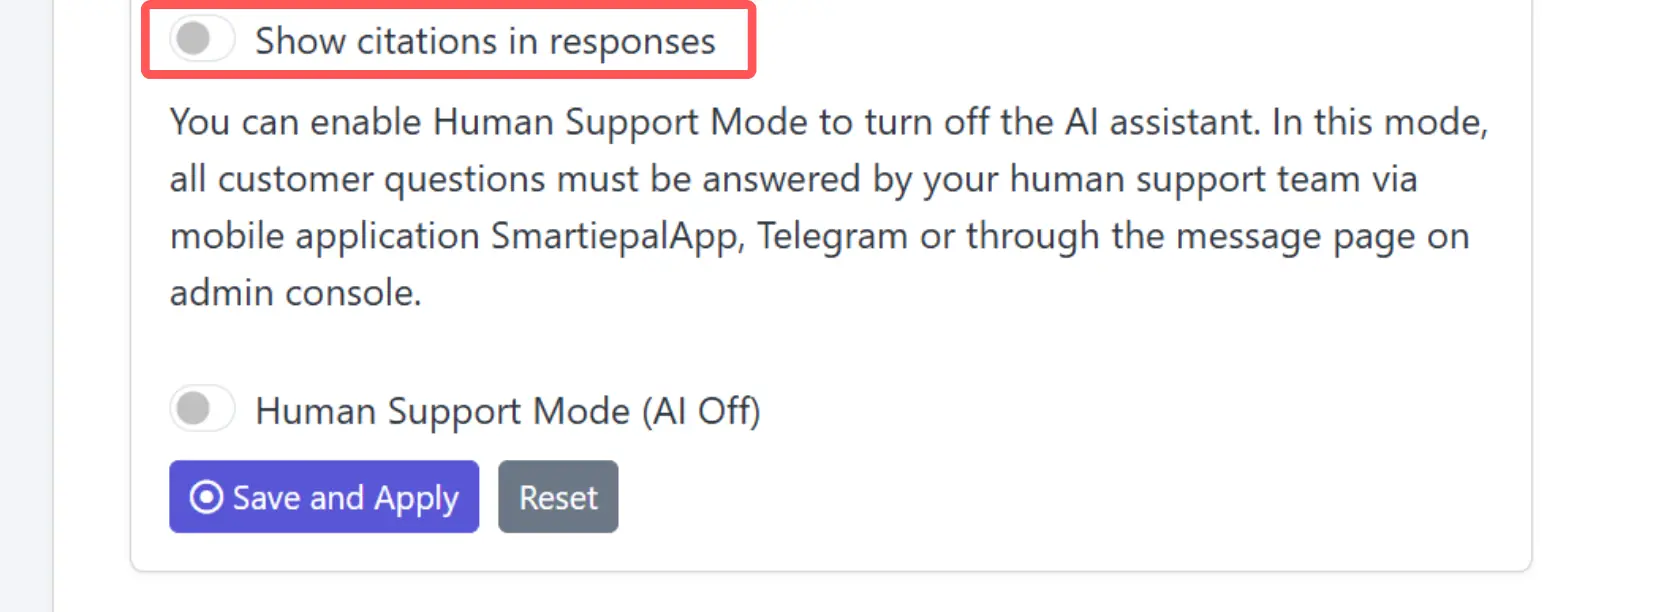
Step 8: Enable Citation Display (Optional)
- Locate the Show citations in responses option.
- Enable this feature if you want your assistant to reference sources or information used to formulate its answers.
- This feature enhances transparency and builds user trust, particularly when your assistant retrieves information from knowledge bases or documentation.
Citations help users understand where information comes from and can increase confidence in your assistant's responses. This is especially valuable for technical support, documentation assistance, or any scenario where source verification is important.
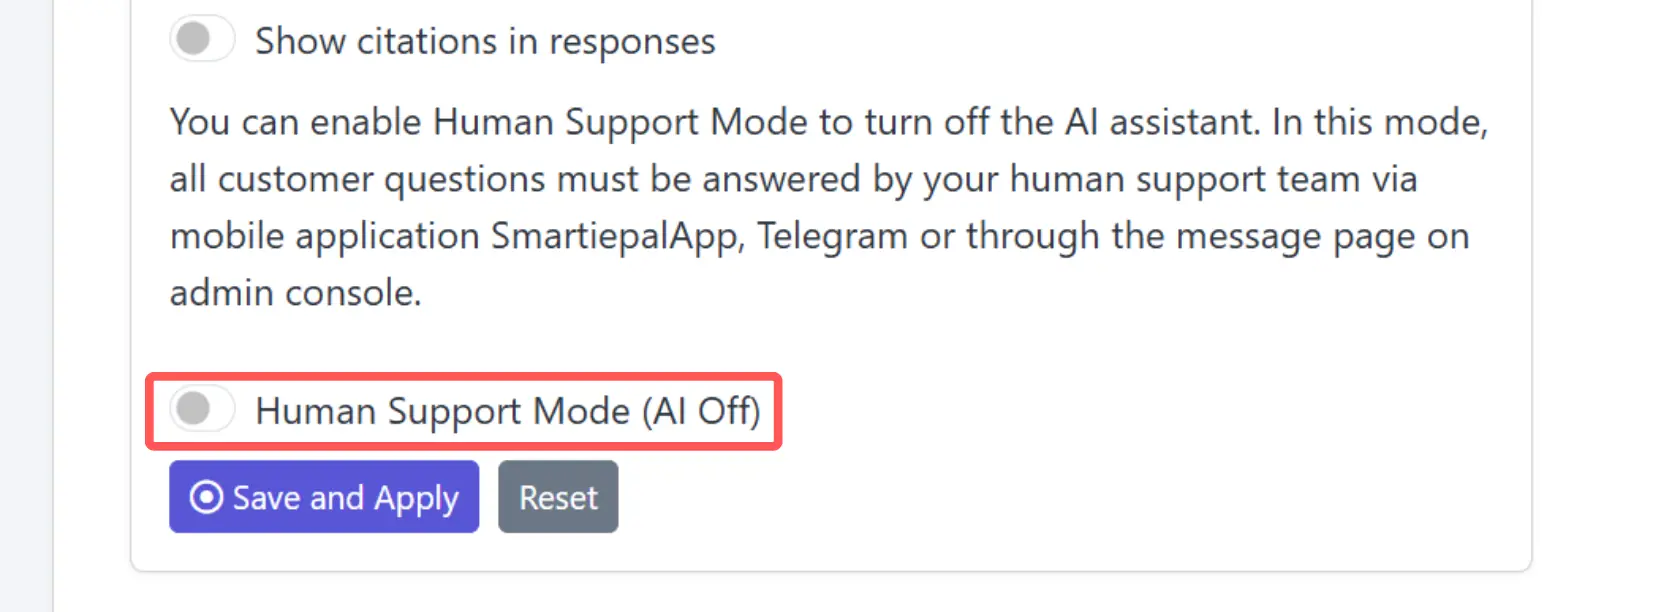
Step 9: Human Support Mode (Optional)
- Locate the Human support mode setting at the bottom of the AI Settings section.
- Enable this option to disable the AI functionality entirely and route all inquiries to your human support team.
- When enabled, messages will be delivered through:
- The SmartiePal mobile app
- Telegram integration
- The Admin Console message interface
Human support mode is useful for situations requiring direct human oversight, such as during critical incidents, for sensitive customer matters, or during testing phases. We'll provide detailed coverage of human support mode and message management in a future tutorial.
Step 10: Save and Apply Your Changes
- Review all your AI behavior settings to ensure they align with your requirements.
- Click Save to apply your changes.
- Your assistant will immediately begin using the new instructions and settings.
- Test your assistant's responses to verify the behavior matches your expectations.
It's recommended to test your assistant after making configuration changes to ensure the instructions are working as intended and responses align with your brand voice.
Summary
You've successfully secured and configured your SmartiePal AI assistant. Here's what you've accomplished:
- Implemented reCAPTCHA protection to guard against bot abuse, prevent unauthorized use, and control operational costs
- Configured AI behavior settings including preset instructions, custom rules, and citation preferences
- Aligned your assistant with your brand standards and business requirements
- Enabled optional features such as citations and human support mode based on your needs
Your chatbot is now secured and configured to represent your organization appropriately while providing helpful assistance to your visitors.
In the next tutorial, we'll explore logs, conversation history, and menu options to help you monitor and manage your assistant's performance.
Ready to secure your assistant? Sign up and implement these security and configuration settings today.