Knowledge Base Configuration for your SmartiePal AI assistant (step-by-step tutorial)
10 January 2026Welcome to the next tutorial in the series where you create and set up your own SmartiePal assistant. In the previous tutorial, you learned how to create custom scripts and set up topic buttons to guide your assistant's responses. Today, we're exploring the Knowledge Base feature – a powerful tool that allows you to provide your assistant with specific information about your business, products, or services.
By the end of this tutorial, you'll understand how to use web crawlers to automatically extract content from your website and how to upload various file formats to expand your assistant's knowledge. Whether you want to make your existing website content accessible to your AI or upload internal documentation, the knowledge base transforms your assistant from a general AI into a specialized expert on your business.
Understanding the Knowledge Base
Let's begin by understanding what the Knowledge Base is and how it works. The Knowledge Base is where you provide context-specific information that your assistant can reference when answering questions. Think of it as giving your assistant access to a library of information about your business – information that goes beyond what the AI model was originally trained on.
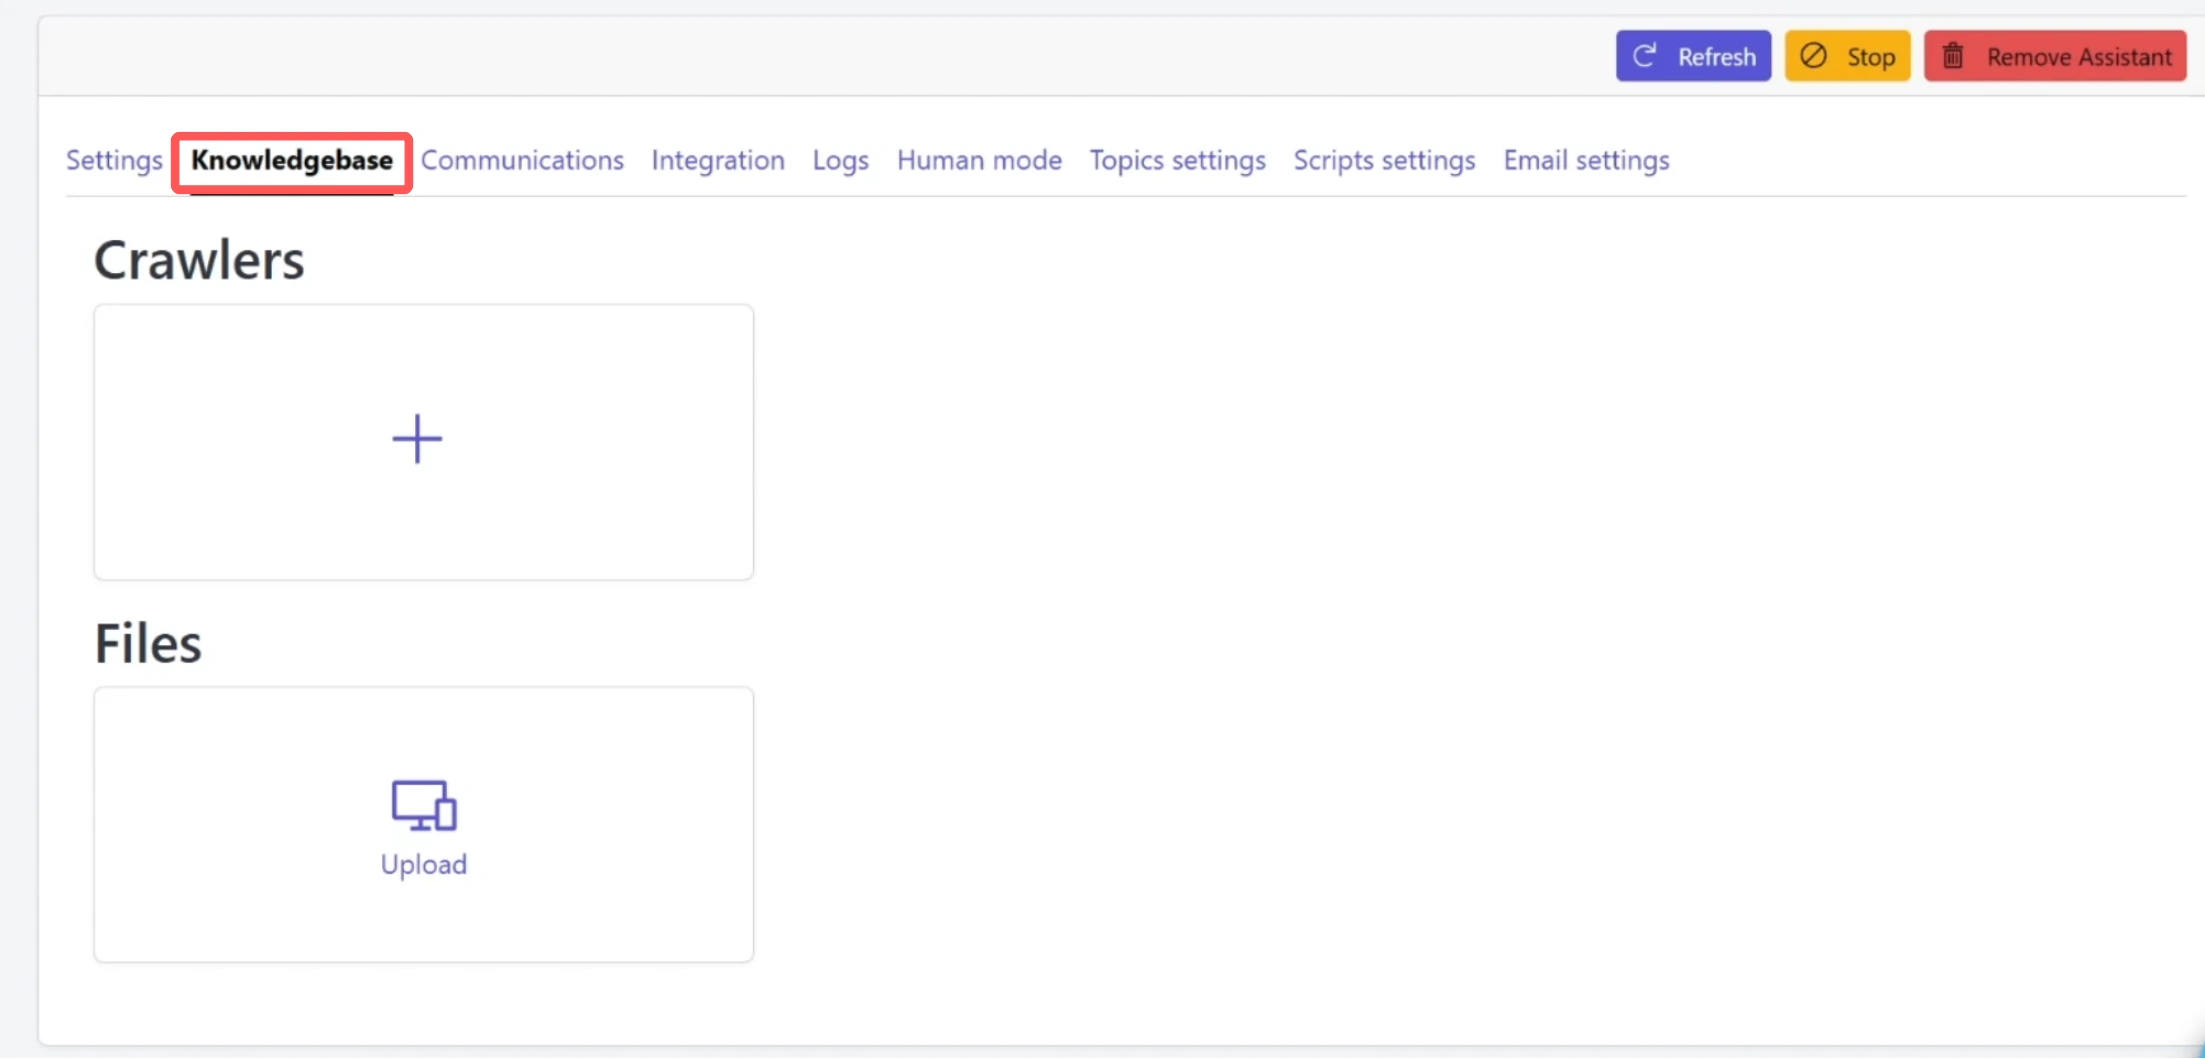
To get started, navigate to the Assistants section and select your assistant. Then click on the Knowledge Base tab. Here you'll find two main sections: Crawlers and Files.
Web Crawlers: Automatic Content Extraction
The Crawlers section allows you to automatically extract content from your website or any web domain. This is particularly useful when you have existing web content that you want your assistant to reference. Instead of manually copying and pasting information, the crawler does the work for you by systematically navigating through your website pages, following links, and extracting text content.
The Files section lets you upload documents directly – perfect for PDF brochures, product specifications, internal documentation, or any other relevant materials that might not be publicly available on your website. We'll explore both features in detail, starting with the web crawler.
Step 1: Add a Web Crawler
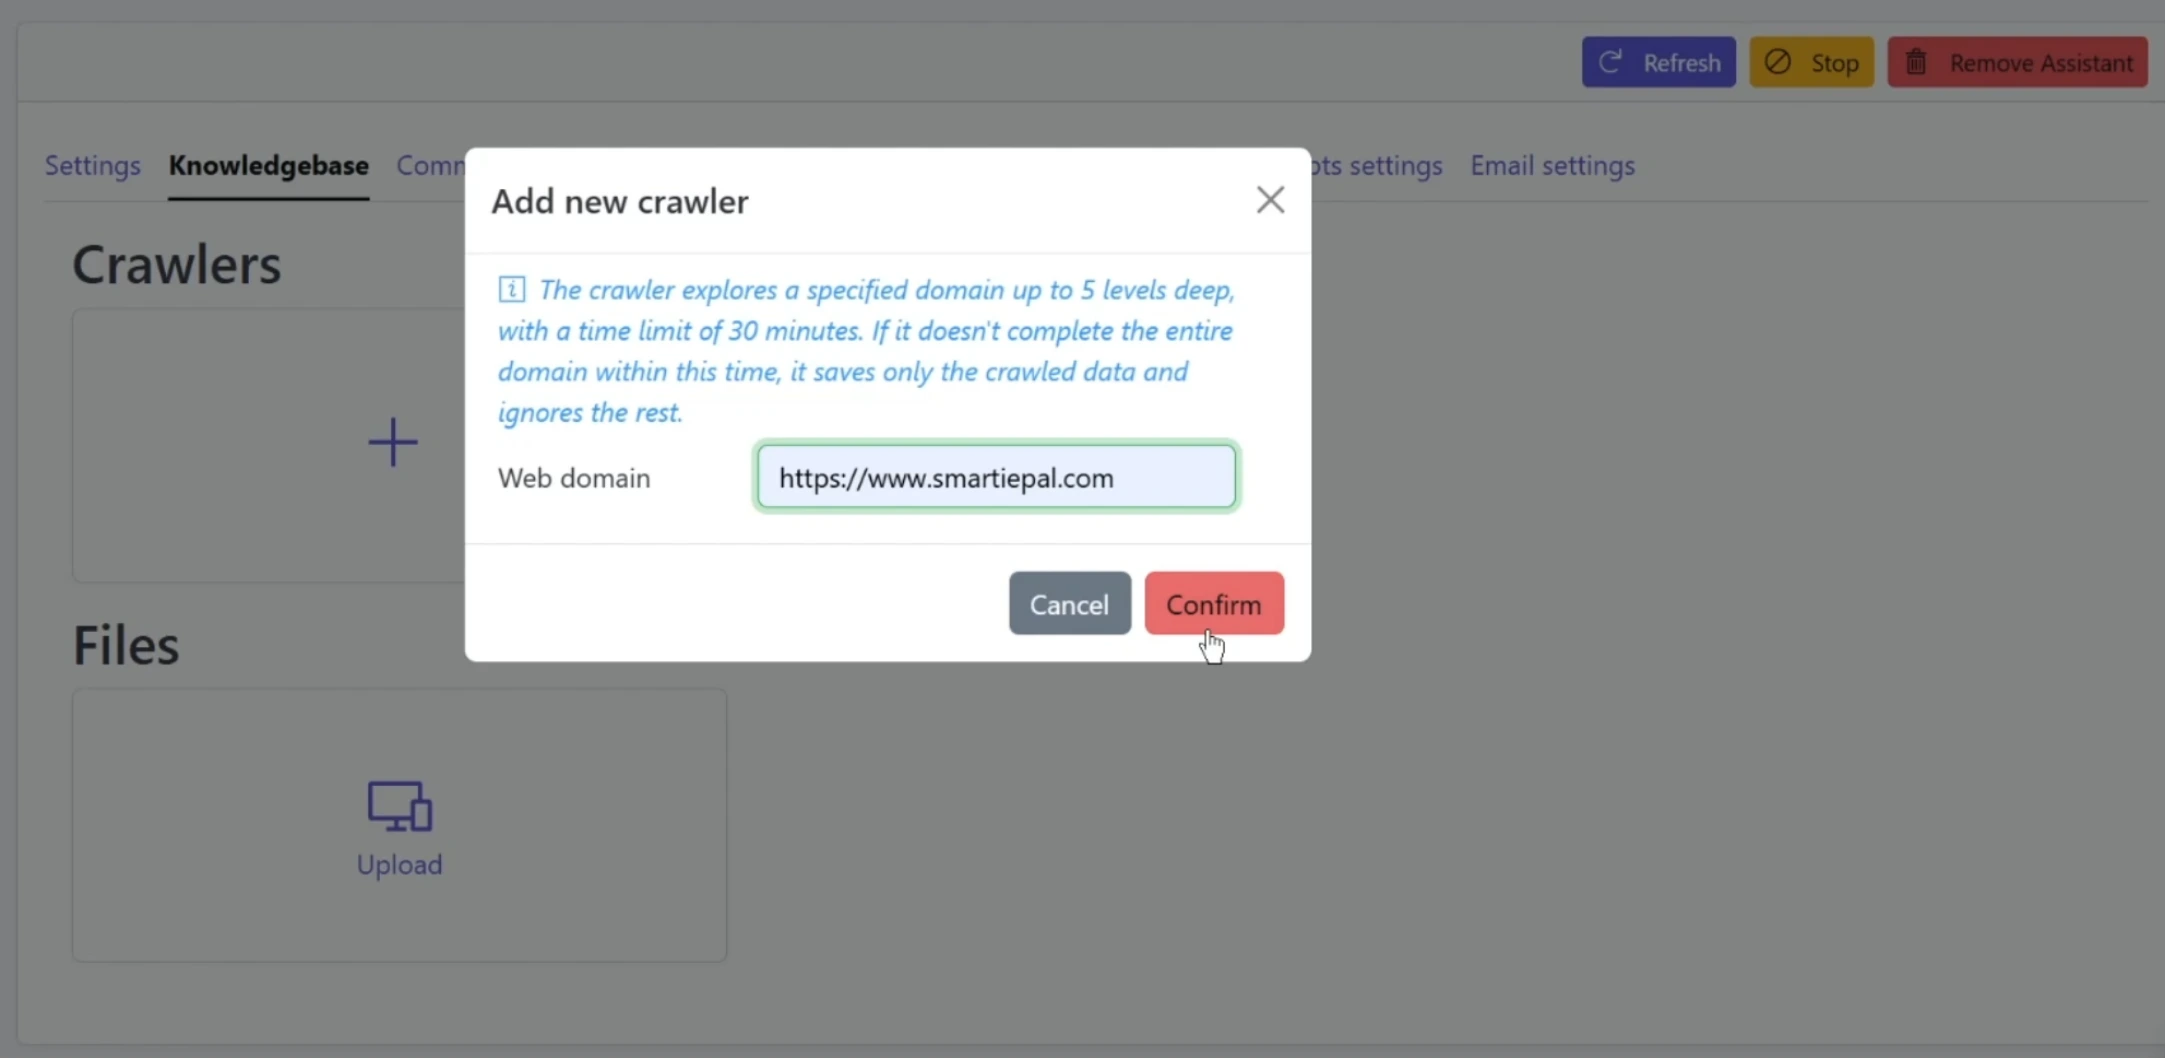
Click the plus sign in the Crawlers section. You'll see a dialog asking for a web domain to crawl. The system will display helpful information explaining that the crawler explores a specified domain up to 5 levels deep, with a time limit of 30 minutes.
This means the crawler will automatically navigate through your website's pages, following internal links and extracting text content from each page it visits. If it doesn't complete the entire domain within the 30-minute time limit, it saves only the crawled data and ignores the rest.
For this demonstration, enter your website domain. For example, we'll use: https://www.smartiepal.com
After entering the domain, click Confirm to save the crawler configuration.
Step 2: Run the Web Crawler
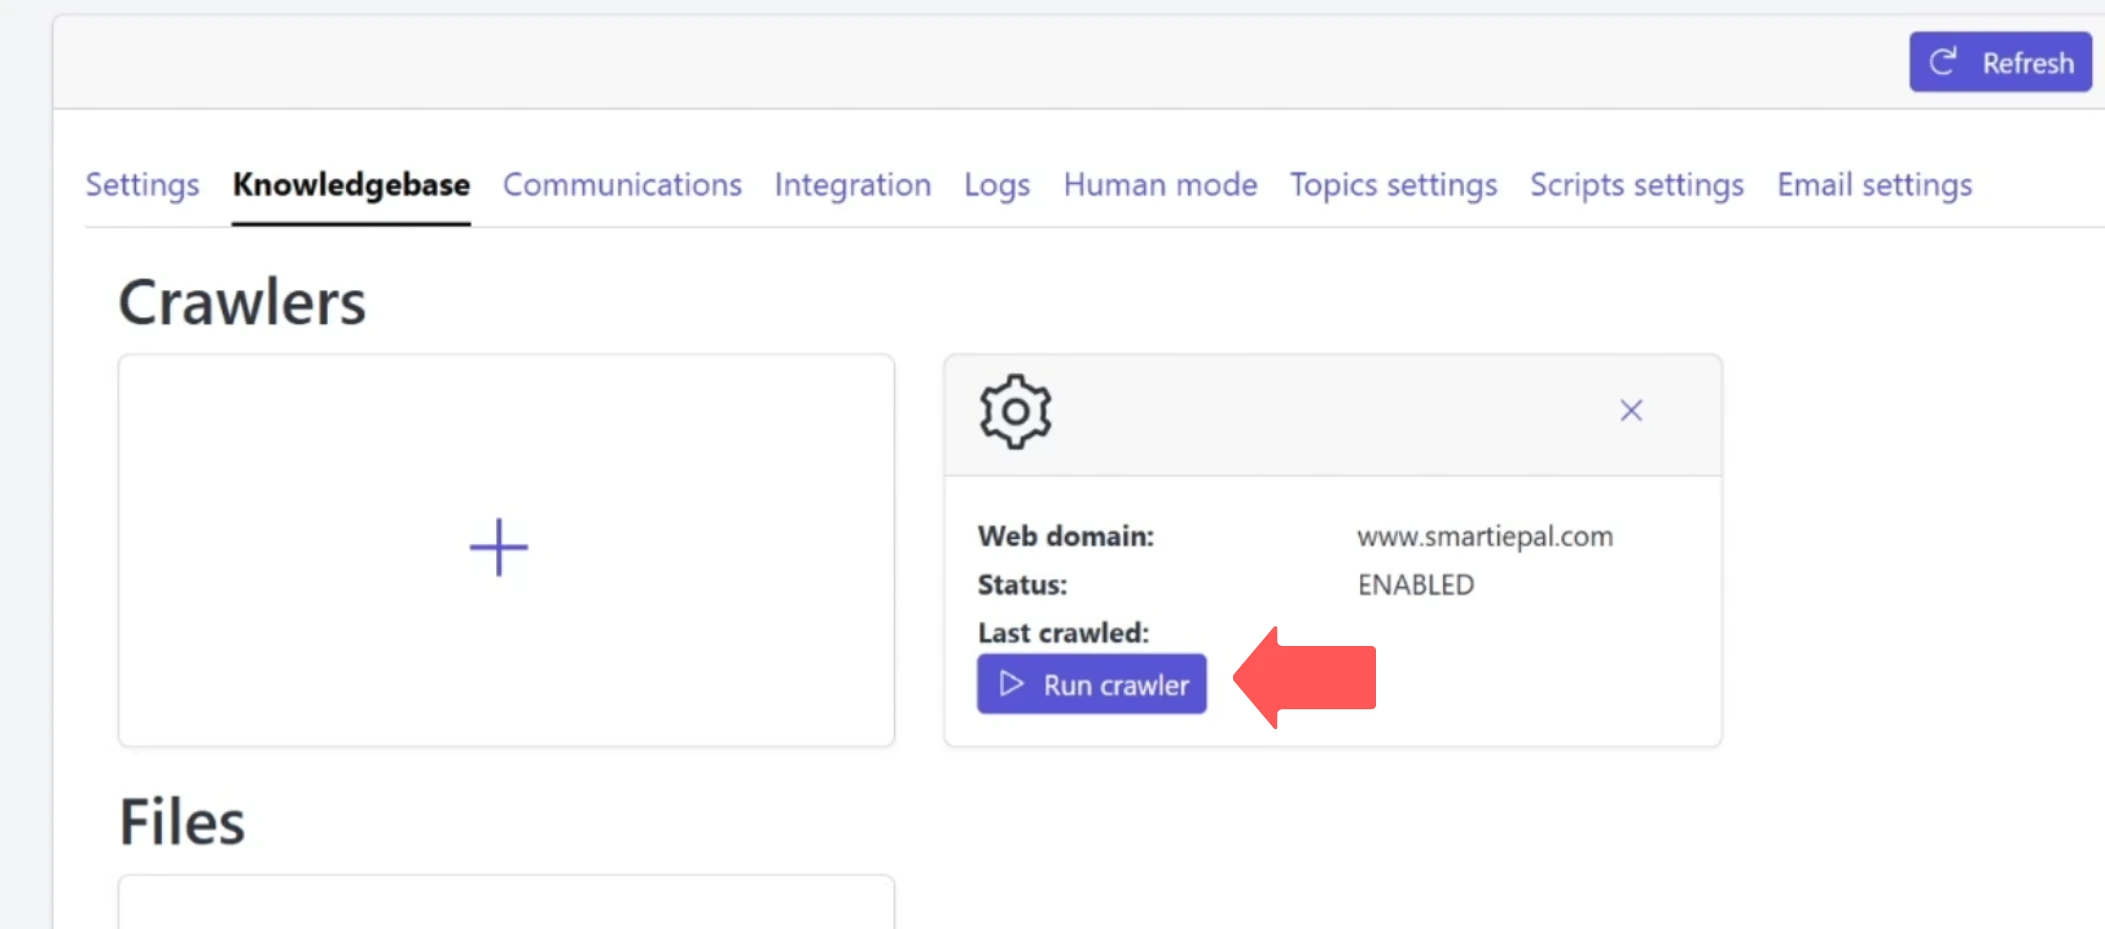
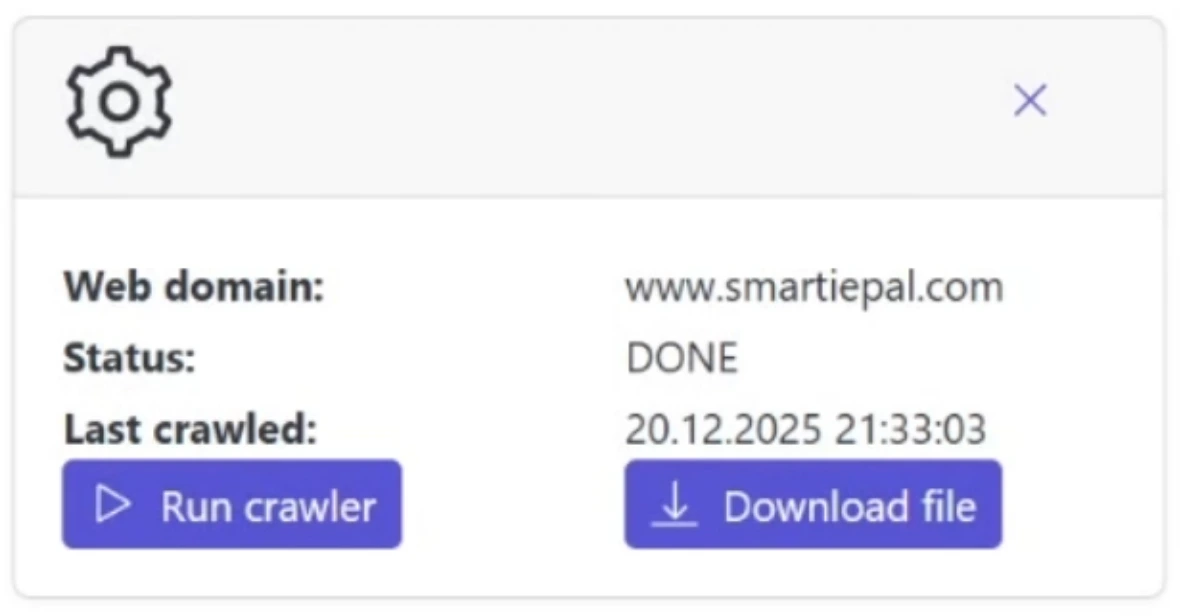
You'll now see a card appear in the Crawlers section displaying your domain (www.smartiepal.com) with a status of "ENABLED." Notice that the "Last crawled" field is empty because we haven't run the crawler yet.
Now let's run the crawler by clicking the "Run crawler" button. The status will update as the crawler works through your website. Depending on the size and structure of your website, this process may take several minutes to complete.
While the crawler is running, we can move on to the Files section to upload some documents. This demonstrates the efficiency of the Knowledge Base – you can work on multiple aspects simultaneously.
File Uploads: Direct Document Integration
The Files section supports various file formats including PDFs, text files, Markdown, JSON, Word documents, and more. This flexibility allows you to provide your assistant with diverse types of information, from formatted documents to structured data.
Step 3: Upload Files to Your Knowledge Base
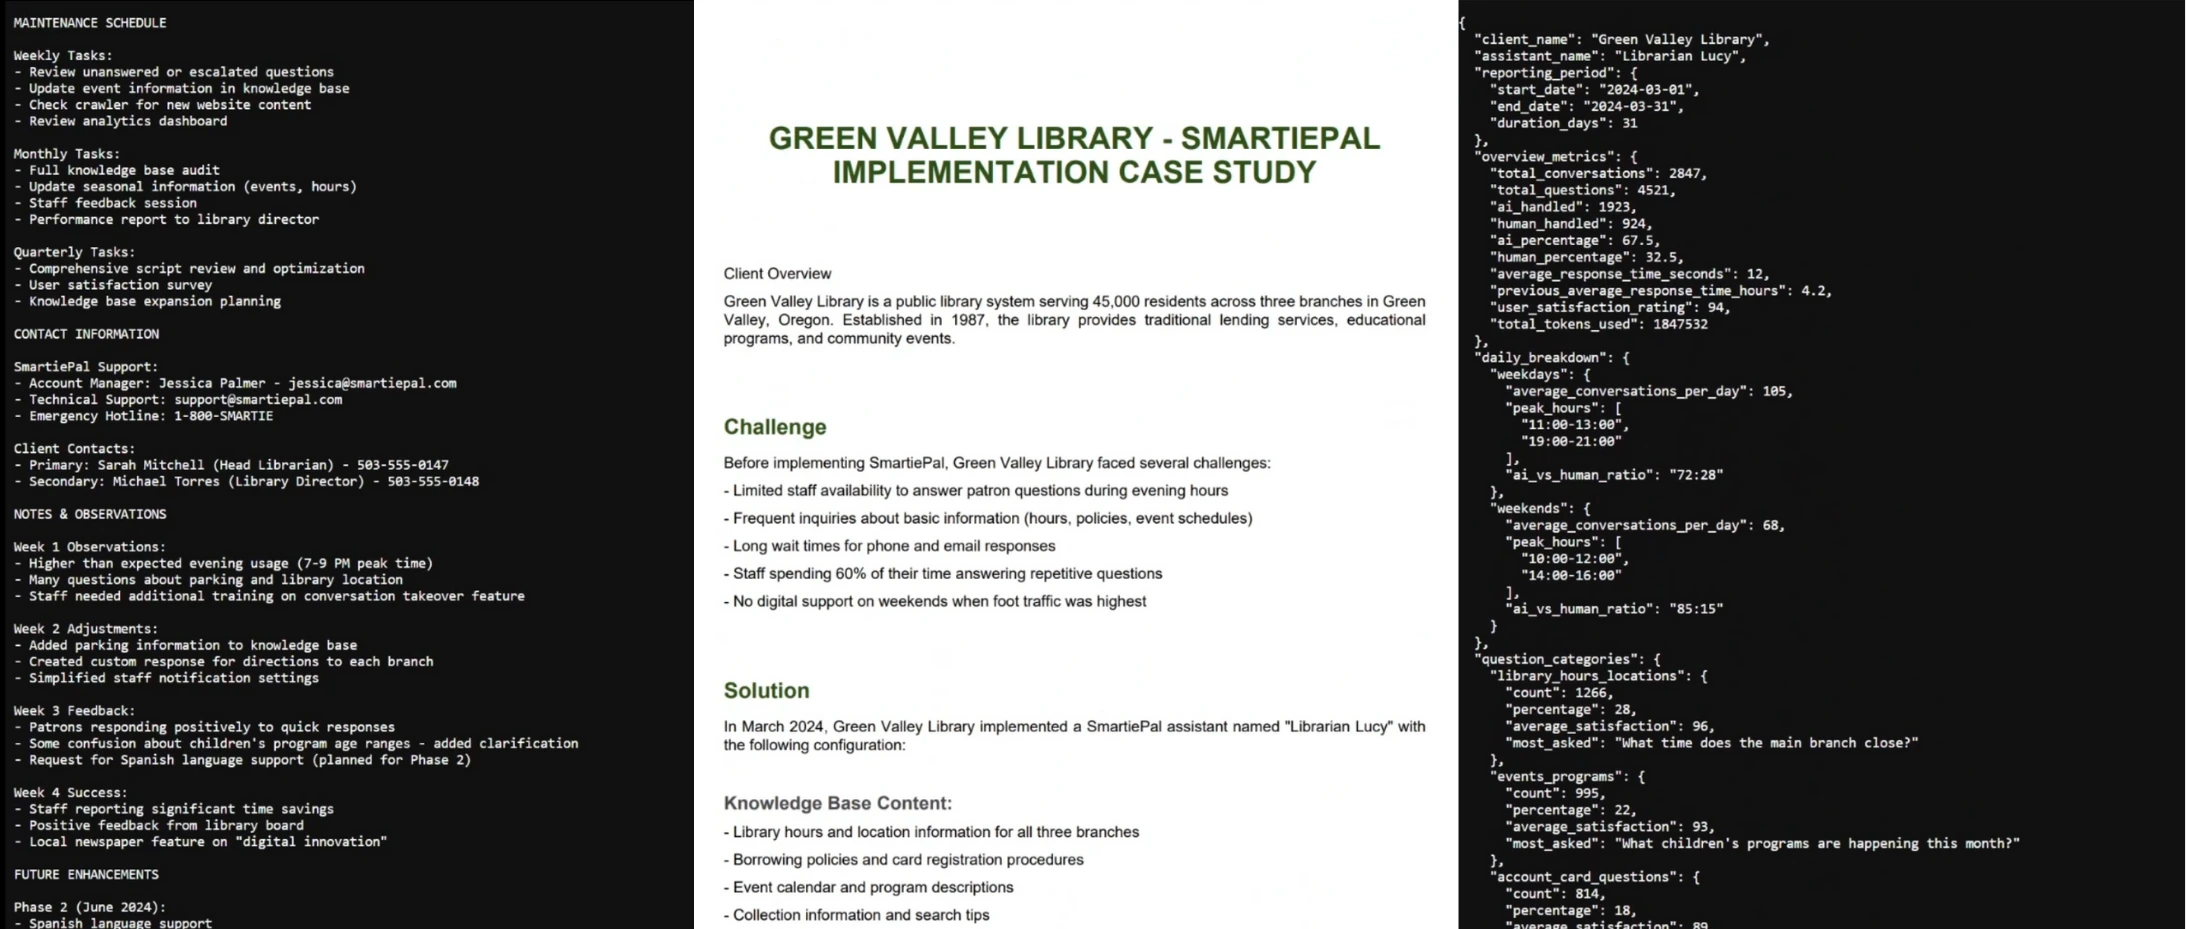
Click the Upload button in the Files section. For this demonstration, we've prepared some example files based on an imaginary client project – Green Valley Library. These files were created specifically for this tutorial to show you how the knowledge base works with real-world scenarios.
Our example files include a case study PDF, implementation notes in a text file, and analytics data in JSON format. These represent the type of internal documents you might upload that wouldn't be found on your public website – perfect for providing your assistant with specialized, confidential, or proprietary information.
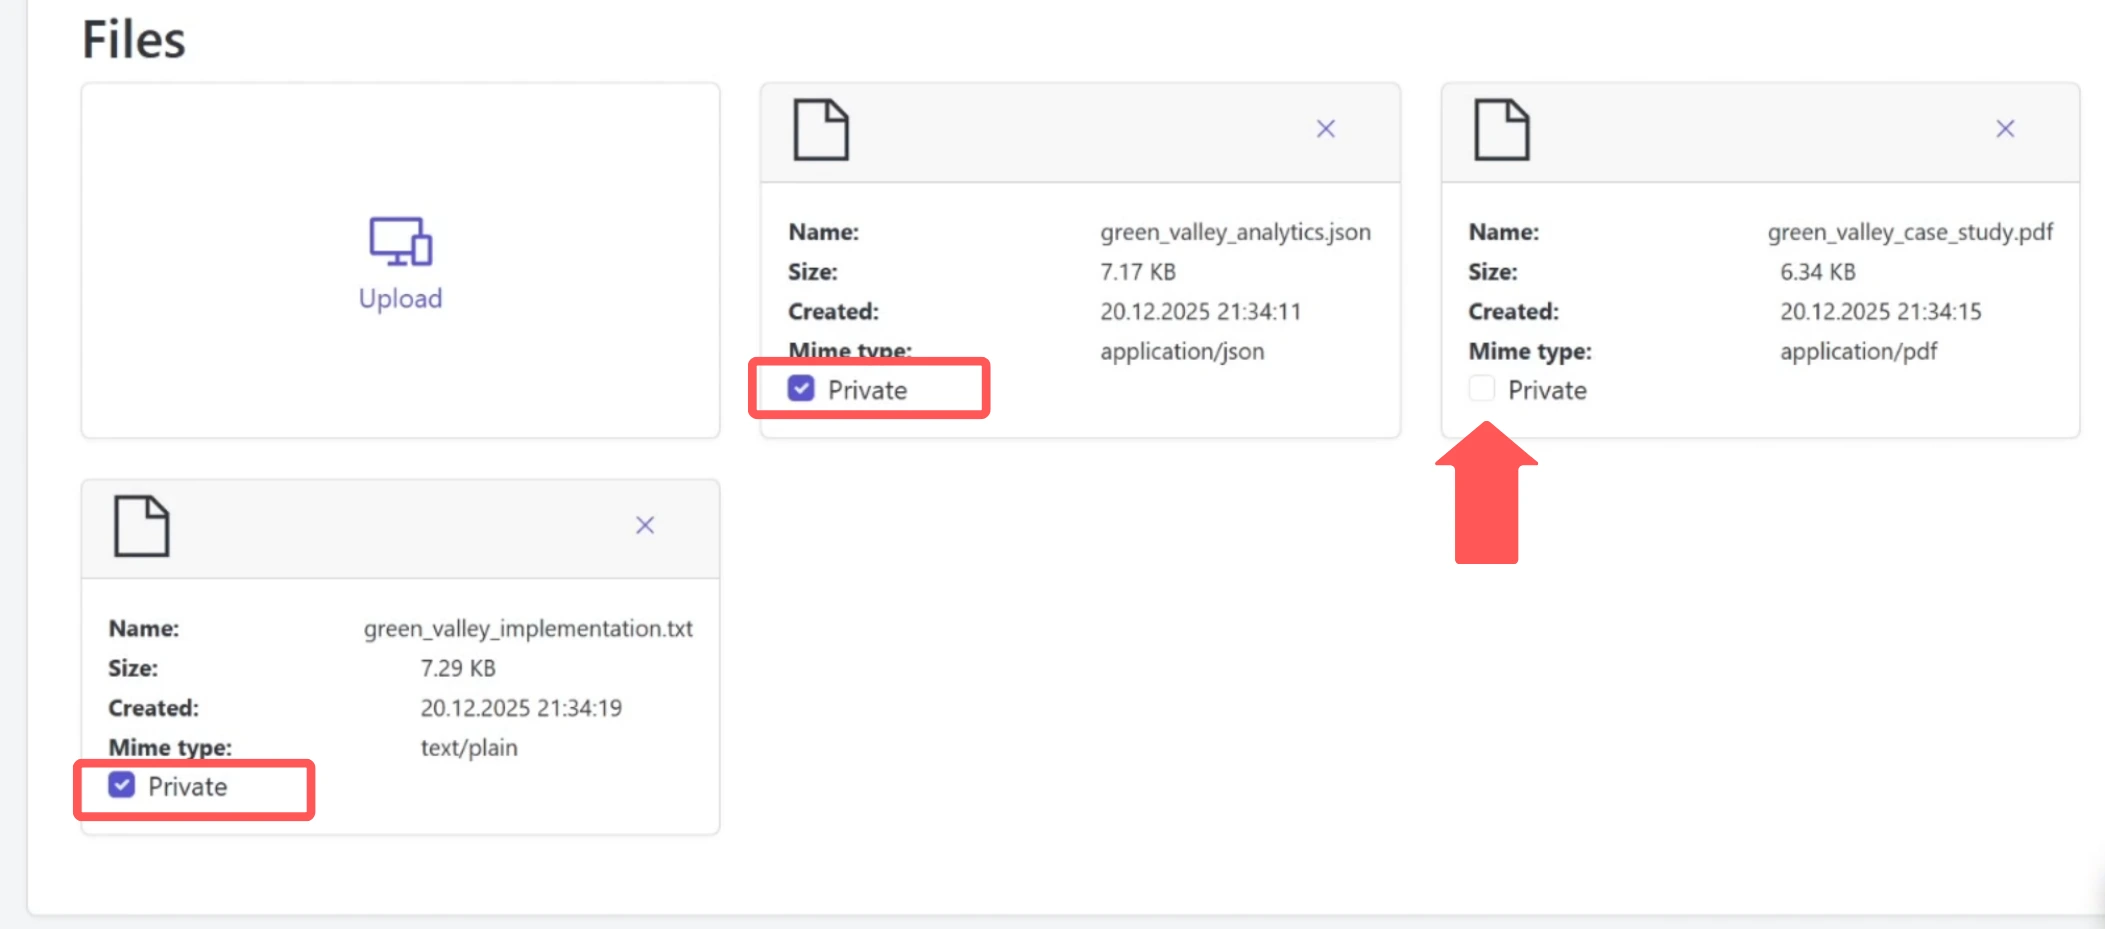
Select your files and click Open to upload them. You'll see the files appear as cards in the grid, each showing the filename, size, creation date, and file type.
Understanding Private Files and Citations
Now, notice that each file has a "Private" checkbox – this is an important feature that controls how information from uploaded files is presented to users. Understanding this distinction helps you manage which sources are visible and downloadable.
Step 4: Configure File Privacy Settings
When a file is marked as Private (checkbox enabled), the assistant can still use the information to answer questions, but it won't cite the source or make the file available for download. The information remains accessible to the assistant – if users ask the right questions, they'll receive answers based on that data. The "Private" setting simply controls visibility and attribution, not access to the information itself.
However, if you want your assistant to provide citations and make files available for download, you can uncheck the Private box. Then, if you enable the "Show citations in responses" option in your assistant's Settings tab, the assistant will cite these files in its responses and users will be able to access and download them directly. This is ideal for public resources, documentation, FAQs, or any information you want to share transparently with source attribution.
For our demonstration, let's keep the implementation notes and analytics files as Private – the assistant will still use this data to answer questions, but won't show citations or download links. We'll uncheck the Private box for the case study PDF so we can show you how the citation feature works in practice.
Step 5: Check Crawler Status and Download Results
Now let's check on our web crawler. Refresh the page to see the updated status. Perfect! The status now shows "DONE" with a timestamp showing when the crawl completed.
You can download the crawled results by clicking the "Download file" button. This gives you a JSON file containing all the extracted information, organized by page URL. Let's open it to show you what it contains.
As you can see, the crawler has extracted text content from various pages on your website, preserving the hierarchical structure and organizing everything by URL. This data is now part of your assistant's knowledge base and can be referenced when answering user questions. The beauty of this approach is that your assistant now has access to all your website content without any manual data entry.
Testing Your Knowledge Base
Now that we've added both crawled content and uploaded files, let's test how the assistant uses this information. This is where you'll see the power of the Knowledge Base in action – your assistant can now provide specific, accurate answers based on your business information.
Step 6: Enable Citations
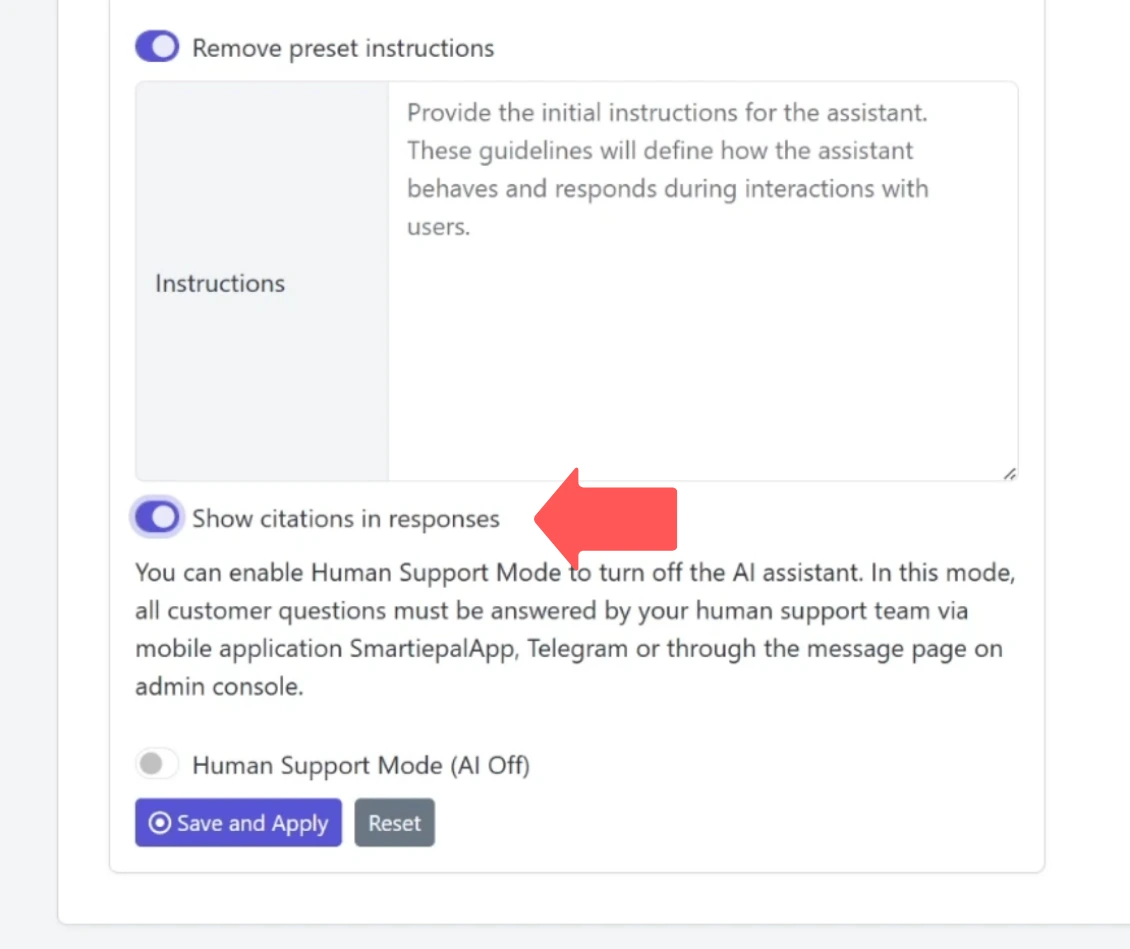
Navigate to the Settings tab where we can interact with the assistant preview. Before we start asking questions, let's scroll down to enable citations.
Look for the "Show citations in responses" option and turn it on. This will allow the assistant to cite the case study PDF we made public earlier, so users can see the source and access the file directly. This transparency feature is valuable when you want users to verify information or explore source documents in more detail.
Step 7: Test with Website Content
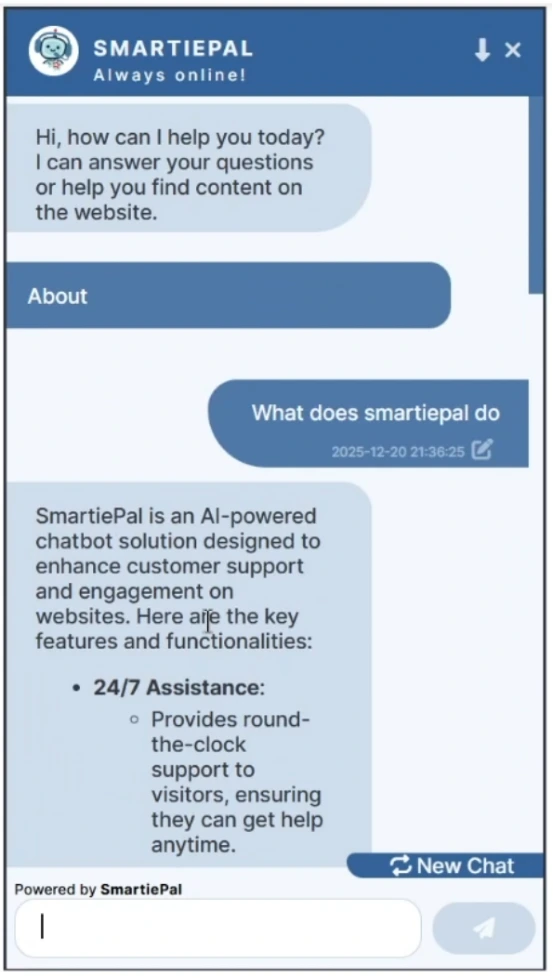
Now let's ask a question related to our website content. Type into the chat preview: "What does SmartiePal do?"
Watch how the assistant responds using information from the crawled website. It can now provide specific details about our platform that it learned from the knowledge base. The response will be much more accurate and specific than if it were relying solely on general AI training data.
This demonstrates the primary benefit of web crawling – your assistant automatically stays informed about your products, services, and offerings as described on your website.
Step 8: Test with Uploaded Files (Public PDF)
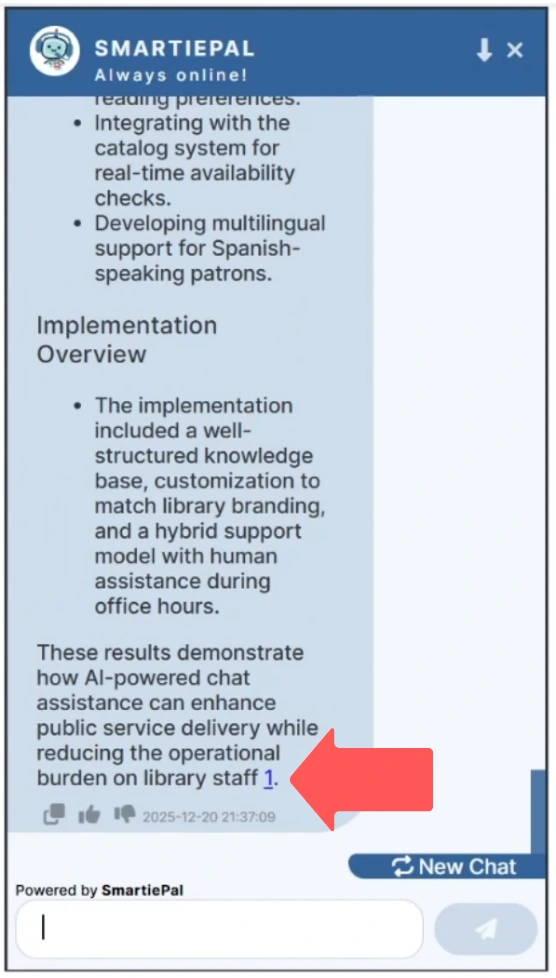
Now let's test with information from our uploaded files. Ask: "What results did Green Valley Library achieve?"
Excellent! The assistant is pulling information from the case study PDF we uploaded, providing specific metrics and outcomes from that implementation. For example, it might mention statistics like 2,847 total conversations or a 94% satisfaction rating – precise details that only exist in the uploaded document.
Notice that because we made this PDF public and enabled citations, the assistant includes a citation to the source file. Users can click on this citation to access and download the complete case study PDF. This creates a transparent, trustworthy interaction where users can verify the information themselves.
Step 9: Test with Private Files (JSON Data)
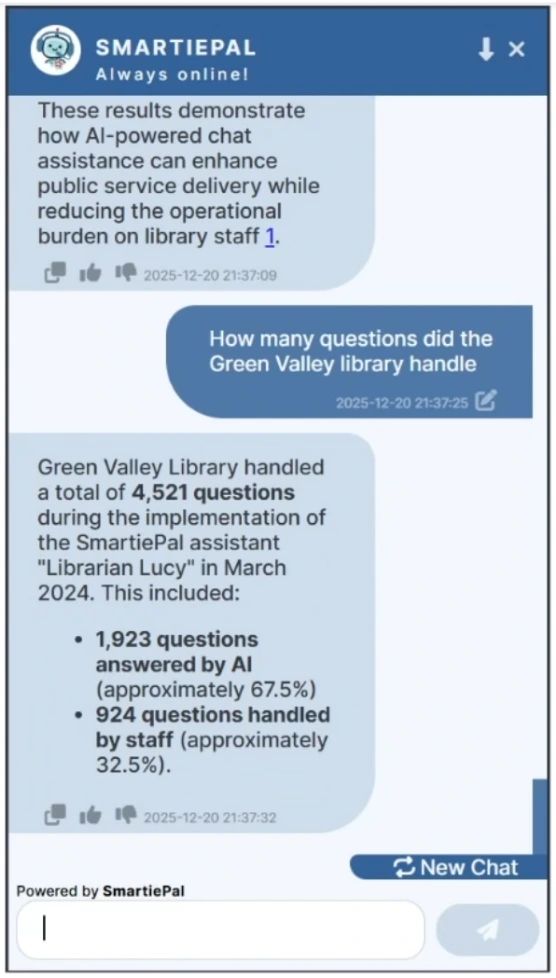
And now, one more question to test the private files. Ask: "How many questions did Green Valley Library handle?"
Perfect! The assistant is now referencing the JSON file we uploaded, giving accurate statistics from their first month – e.g. mentioning 4,521 total questions with 1,923 handled by AI. Notice that even though this file is marked as Private, the assistant can still use the information to answer questions.
However, unlike the case study PDF, there's no citation provided and users cannot download this file. The assistant uses the data to inform its response, but the source is not attributed. This is useful when you want your assistant to be knowledgeable about certain data without providing direct access to the source files – users get the information they need through conversation, but can't download the underlying documents.
How the Knowledge Base Transforms Your Assistant
These tests demonstrate how the Knowledge Base transforms your assistant from a general AI into a specialized expert on your business, products, and services. By combining web-crawled content with uploaded documents, you create a comprehensive information resource that your assistant can draw from to provide accurate, specific, and helpful responses.
The power lies in the flexibility: you can use public information from your website, private internal documents, or any combination thereof. You control what information is shared and how it's presented, ensuring your assistant provides exactly the level of transparency and detail appropriate for your business.
Best Practices for Knowledge Base Management
To make the most of your Knowledge Base, consider these strategies:
Keep your crawled content up to date by running the crawler regularly, especially after major website updates. For files, organize them by category or topic so you can easily manage and update information as your business evolves. Use the Private checkbox strategically – mark confidential documents as private while leaving public resources available for citation.
Consider creating a content maintenance schedule. For example, you might run your web crawler weekly, review uploaded files monthly, and audit your entire Knowledge Base quarterly. This ensures your assistant always has access to current, accurate information.
Remember that the Knowledge Base works seamlessly with all other SmartiePal features. Your scripts and topics can reference knowledge base information, and the system works in both AI mode and when transitioning to human support.
Summary
Throughout this tutorial series, we've covered everything you need to create and deploy a fully functional SmartiePal assistant. You've learned to:
- Customize your assistant's appearance and communication style to match your brand and website
- Protect your assistant from abuse with security features like reCAPTCHA
- Navigate the platform and monitor your assistant's performance through comprehensive analytics
- Create specialized instructions and interactive topic buttons to guide conversations
- Set up team members and integrate with Telegram for human support capabilities
- Configure intelligent scheduling between AI and human responses with automated transitions
- And today, provide your assistant with specific knowledge through web crawling and file uploads, creating a truly specialized business expert
You now have all the fundamental knowledge to create, customize, and deploy your own SmartiePal assistant. We encourage you to experiment with different combinations of these features and discover what works best for your specific use case. The more you explore, the more you'll understand how to make your assistant truly effective for your users.
The Knowledge Base feature is particularly powerful because it bridges the gap between general AI capabilities and specific business expertise. Your assistant can now speak authoritatively about your products, reference your policies, and provide information that's unique to your organization.
Ready to build your assistant's knowledge base? Sign up and start creating your specialized AI expert today.